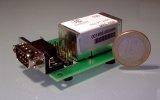
messing with the world's smallest Linux computer
 On the occasion of my *cough* 30. birthday, I got an amazing piece of engineering: Picotux, the world's smallest Linux computer. Thanks once more, Georg!.
Now, under ordinary circumstances a 32-bit ARM 7 running at 55 MHz, 8 MB of RAM, 2 MB of Flash and a 100 Mbit network port is nothing to write home about, but if you have all that squeezed into half the volume of your left thumb, things start getting interesting.
It comes loaded with uClinux 2.4.2x, Busybox and some other binaries. If you boot it in a DHCP network, it will ask for an address and you can telnet into it and start looking around. On the CD you also get the cross development toolchain needed to mess with the filesystem and add new software. By just issuing make in the build subdirectory, the kernel, filesystem and flash image are being built. But how to get this file onto the picotux? Unfortunately, the "documentation" is a bit short on this topic, so it took me some time to figure it out. You need two things to make it work: a DHCP server that can announce file names via BOOTP and a TFTP server offering those files. On FC3 (and probably most other distros) this is accomplished by adding something like
host picotux {
	hardware ethernet 00:14:66:00:xx:xx;
	fixed-address 192.168.0.2;
	filename "system-small.elf";
}
to /etc/dhcpd.conf and configuring TFTP like
service tftp
{
        socket_type             = dgram
        protocol                = udp
        wait                    = yes
        user                    = root
        server                  = /usr/sbin/in.tftpd
        server_args             = -vvvv -s /opt/picotux/build
        disable                 =  no
        per_source              = 11
        cps                     = 100 2
        flags                   = IPv4
}
in /etc/xinetd.d/tftp, assuming that your picotux stuff lives in /opt/picotux/. Then you have to perform the following steps:
- turn off your picotux
- short JP4 - this tells the picotux to ask for the firmware file
- turn it on
- wait until the two ethernet LEDs go dark and the picotux is issuing a DHCP request
- remove JP4
- wait for the file to be transferred and flashed (ca. 3 min)
- the picotux will now reboot and issue a new DHCP request
- log in and be happy
Using the NFS root
When doing software development it's extremely convenient to have an NFS mounted root filesystem in order to avoid the time-consuming flash procedure every time a file has changed. In order to use this method, you have to set up an NFS server and add
/tftpboot/192.168.0.2 192.168.0.2(rw)to your /etc/exports. Then create /tftpboot/192.168.0.2/ and copy the content of build/staging_target-small into it. Note that the picotux is trying to NFS mount /tftpboot/[ip-address]/ and not just /tftpboot/! Now there's only one pitfall left: the kernel is asking for a DHCP address, and /etc/dhcp.script is asking again, leaving the system without an IP address at all. Therefore, delete or rename /etc/dhcp.script. After flashing system-netboot.elf you're ready to use the NFS root filesystem.
Currently I'm trying to port a HTTP server to the picotux, so stay tuned for updates!
a 2026 daduke production. all rights reserved.
