
Welcome to the tux2tty website.Tired of that 2400 dpi color laser printer of yours? Got this ancient teletype sitting in your cellar? Here you'll learn how you can connect this amazing piece of communications history to your computer via standard RS232 serial line and print /var/log/messages or whatever using a small PERL program.
When I first got my Siemens T37 teletype (thanks again, Georg!) and started looking around on the web for information concerning teletype circuitry and codes, I was a bit disappointed, because almost all people have is nice pictures. But with the help of a book [1] I was finally able to come up with a working interface.
Teletype theoryIf you do have a teletype, you probably know some basics about it. I'll tell them anyway, just to be on the safe side. What we needThe circuitry needed to connect the teletype to the PC consists of two major parts: a line current source and a 'switch' that controls the line current according to the signals coming from the PC. The line current sourceYou might be lucky and already have such a supply (for example, there are some with several sockets to operate a number of teletypes locally). If not, here's how to build one. It's a standard power supply, only the secondary voltage is a bit higher ;-). As usual, don't blame me if you burn down your house or fry your goldfish. You should know what you're doing when you play around with 110V.Here we have a schematic of the power supply: 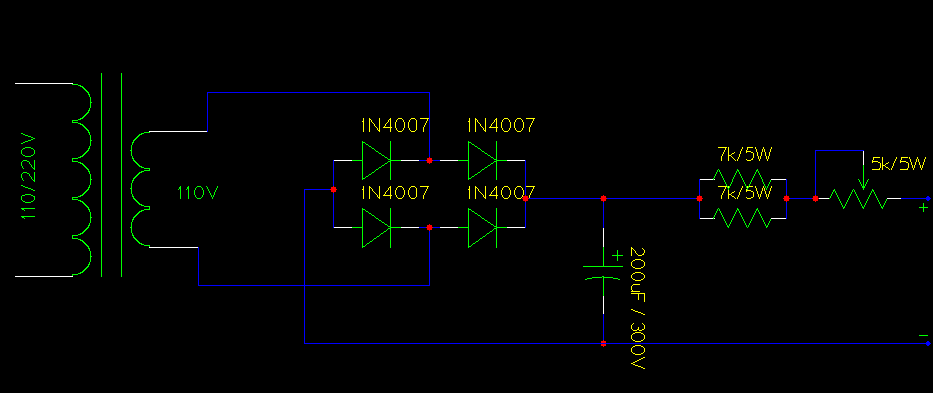
The transformer is a 220V : 110V (Europe) or 110V : 110V (US) type, 6 W. Use something like 1N4007 for the diodes (the common 1N4148 does only 100V). The two 2k resistors and the variable 5k resistor are used to control the 40mA current thru the receiver magnet. Note that these resistors dissipate almost all of the power -> they get hot! Therefore, be sure to use 5W ones. To adjust the current, find the magnet coil (take the teletype connector and measure the resistance between all four pins - the coil has a resistance of 200 ohm), and connect its pins to + and - of your supply. Then use an amperemeter to measure the current and adjust the variable resistor until the current reaches 40mA. If you now wire the two sender switch pins in line with the magnet and power on the teletype, it should stop ratatatatating (as I'm sure it did before) and any text typed on the teletype keyboard should be written out on paper. The RS232 interfaceNow we want to send characters from the PC to the teletype. This is done (and this is also the way the sender switch of the teletype does it) by breaking the current loop for each low bit. The easiest way to do this is with a transistor. The schematic shows how:
We have to do a little bit of signal shaping, because RS232 uses +/- 12V on TX relative to GND. I know it's very bad to connect TX of RS232 to GND of our power supply and GND of RS232 to the base of our transistor, but it works, and you can use some more sophisticated circuitry (most notably an inverter) if you're not happy with it. I'll try to explain the problem: RS232 is active low, i.e. TX is -12V relative to GND when nothing is transmitted. The idle state of our teletype is 'current on', which means that the base of the transistor has to be high. Therefore, I decided to 'invert' the input signal by exchanging TX and GND and cropping the negative voltages with the diode. As I said, not nice, but it gets its job done. Drop me a mail if you have something better. If you have connected everything as shown above, the PC is powered on and its RS232 connected to the interface, the teletype should again be 'silent'. Congratulations, the hardest part is over now! The softwareAs mentioned above, we have to send Baudot-code in 5N2, 50 baud to the teletype. If you have a US model, you have to try to 'tune' it to 50 baud as the UARTS cannot do 45.45 baud. The teletypes I know all have some screws which you can use to adjust different parameters. Try them out or get a manual.
stty -F /dev/ttyS0 cs5 50 cstopbin Unix. ttySx has to be your serial port of course. cs5 sets 5 data bits, 50 means 50 baud, and cstopb tells the UART to use two stop bits (actually, teletype theory says 1.5 stop bits [anyone else remembering that 'bit' always meant 'smallest unit' ;-) ], but as the stop bit is the same as the idle state, this doesn't matter). The ASCII -> Baudot translation is done by a short PERL script. It contains everything needed to output text on the teletype. It reads any text from STDIN (or from files if redirected with <) and prints it to the teletype. Characters not existing on the teletype are either substituted (_ becomes -, for example) or just omitted. Lines with too many chars are wrapped around. New lines are preserved. That way, you can even print ASCII art on your teletype (see logo!). Is all this useful?Of course not. You spend several bucks and many hours trying to activate this teletype which then prints about 3 chars/sec from a very limited character set (no gfx at all) and makes one helluva noise. But hey, you were tired of your color laser printer, remember??
Whom to ask for help?Well, this page was made by me, Christian, being heavily inspired by Georg. Please feel free to send me questions and ideas, complaints go to /dev/null.
Further informationIf you want a better program or more US-oriented information, you can go to Bill's Heavy Metal site. He has a highly evolved control program (you can even surf the web on your teletype!). Willem Noorloos in the Netherlands has an old Army Radio Truck with a teletype. General teletype information can be found on teleprinter.net or rtty.com
| |
|
| |
Literature:[1] H.-J. Pietsch, Amateur-Funkfernschreibtechnik RTTY, Franzis 1979 |